Losing grip – Lessons learned, and not
G’day mates! Last week I had the pleasure of showing off the new body of my SCX10 III, Viper. Today we’ll have a look at lessons learned. First, an easy one: black and yellow worked well as a recipe for one eye catching color scheme that would look good both out driving, and in pictures published on this very website. Think New York cabs, yellow for the very same reason: to stand out against the background. Or a wasp for that matter, highly visible, not easily caught and eaten by mistake.
Now, on to things that I could improve upon. While black on yellow provides great contrast, it also makes for a very unforgiving paint combination for this very reason. Any mistakes will be very easily visible, and I made a few. I thought I was careful when I masked the body before painting all the black, but the tiny paint particles an airbrush produce managed to find a couple of small gaps between layers of tape. I didn’t see them before I started laying on the yellow paint, but as the layers of yellow started to build up to a solid coverage, areas with a black tint started to show up in a couple of places. I went back over these with a scalpel, scraping away the paint down to bare lexan, and then painted it yellow again. Even so, it didn’t turn out perfect.
Lesson learned: use high quality masking tape. I love Tamiya’s tape, but only had the 6mm wide one, so used regular painter’s tape for all the larger areas. Being thicker, it doesn’t follow curves very well, and that might be why it let paint through at a couple of places. I won’t let this happen again, so an incoming order from amainhobbies includes Tamiya masking tape in a generous selection of different widths.
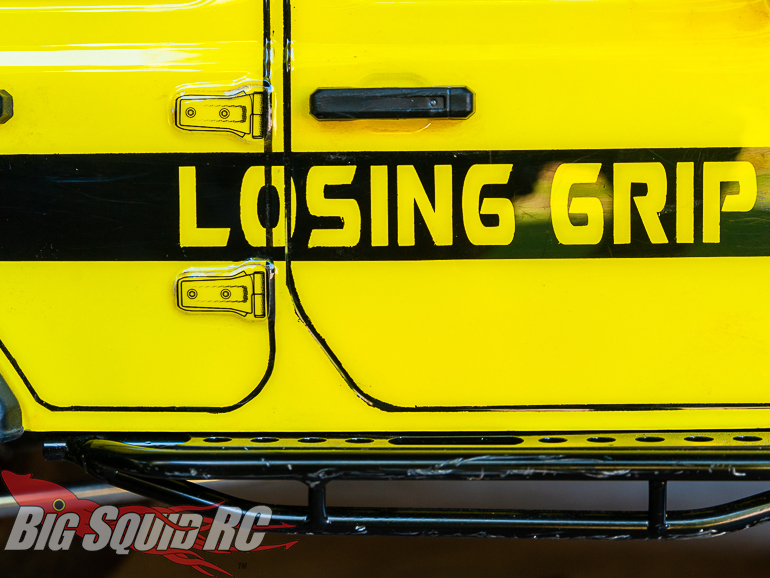
The panel lines didn’t turn out quite as well as I hoped they would. I masked them on the inside and then painted, first using a brush, and then switching to airbrush. Had I used the airbrush from the start, I would probably not have the bleeding of black into the yellow I have in a few spots. Also, I can’t quite decide whether panel lines look good or not. Sure, they adds a bit of definition to the body, but maybe just a tad too much? And third, the lines are a bit too thick and slightly uneven. It’s hardly noticeable from a normal viewing distance of five feet, but apparent from up close as you see in the picture above. Tiny imperfections in the “Losing grip” text as well, from accidentally scraping off black paint with a scalpel when I removed the vinyl masking.
There’s a lot of different methods for doing panel lines: masking off and painting on the inside as I did, or doing them on the outside using a sharpie pen, Kyosho micron tape, or thin strips of vinyl cut with an exacto blade. Teppei Makimoto‘s method can be seen here, jump to 8:50. He paints the panel lines first of all, by applying masking tape to the inside, then cutting out the panel lines and painting them using a brush, thinned paint and several layers. Another method mentioned is masking off the lines on the inside using micron tape, and then painting them last.
Lesson learned: use a method for painting panel lines suitable for the chosen body and paint scheme. Also, don’t do the masking when being really tired after a night shift. Check out the rear of the back door in the picture below. The panel line isn’t where it should be.

Oups! If you ever start wondering why I’m only showing you the left side of this car, this is why.
Finally, lesson not learned: not to talk about mistakes. Like, never start a speech by saying “Gee, I’m not a speaker, but…” Had I just showed off a bunch of pictures of this body, without any comments on the things that didn’t turned out well, you wouldn’t ever have noticed. However, as one of your faithful columnists I feel a certain obligation to share not only my profound insights into this hobby, but also the small mistakes that mar the finished job.
To read another column, hit the link.


